If you’re like me, the last thing you want to do after a long day of off-roading is search around whatever small town you happen to be in for the only gas station with an air compressor that doesn’t say “out of order” on it. One option would be to lug around an air compressor inside your truck which will most likely be bouncing around during the day’s activities, and at a minimum take up some of the limited cargo room in your rig. A better option is to have the whole on-board air system neatly tucked away hidden from view, yet easily accessible when you need it.
Since we planned on adding other items that would require a small air tank, we chose the Wolo 840 Turbo Compressor and 5.5L tank combo kit. Be careful if you purchase this online – it can be had for under $300 bucks, but some retailers are trying to get double that. Don’t be a sucker.
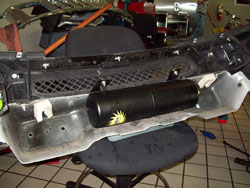 We liked this tank setup since its long and skinny design fits perfectly behind the metal bumper of the H3. This location shields it from damage, and keeps the distance between the tank and the compressor relatively short. Ideally, the compressor would be right next to the tank, but there isn’t enough room in the front bumper – so we put it behind the air box in front of the liquid reservoirs and ran about a 5 or 6 foot line to the front. When it comes to air systems, having fewer fittings and hoses will always mean less leaks and issues down the line, but sometimes it’s unavoidable.
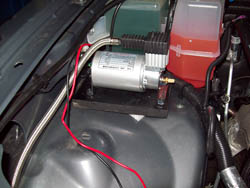 The area the compressor sits on isn’t completely flat, so we put a small block of wood and a little foam padding underneath to straighten things out. While the location under the hood protects it from the elements, it’s also susceptible to overheating. Hot days, hot engine bays, and prolonged use can cause the unit to shut off, a built-in feature meant to prevent it from burning up. So, if you’re airing up four tires, it’s better to just pop the hood whilst inflating.
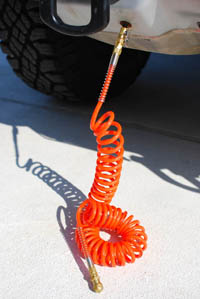 Since the tank is right behind the front bumper, it made it easy to install an extended fitting that projects through the bumper. The fitting came with the tank kit, and allows easy attachment of the air hose (also included). The coiled hose may look short, but when attached at the front bumper, it’s able to reach all four tires – just not the spare.
For good measure, we installed a power switch under the dash for the compressor. If your system ever developed a leak, the compressor would constantly run, probably overheat, and possibly kill your battery if you weren’t running the truck. If the leak is behind the bumper and you’re on the trail – you’re probably not going to mess with removing the brush guard, grille, front bumper, etc – to get at the problem. Save yourself some headaches down the road and get the kill switch.
The install costs on a similar system will vary from shop to shop – but it’s going to set you back at least a couple hundred if not more to have it professionally done. This may be on the upper-bounds of for the DIY crowd, since fashioning some small brackets for the bumper mount and shaving down some plastic areas is involved to make it fit perfectly. I’ve seen plenty of DIY installs more complicated than this on the various HUMMER forums, so to each his own.
If you’re going for a sight unseen on-board air system, this is a good bet. You may prefer another compressor brand, but this kit had everything we were looking for to complete this install and setup the next one, when we put in a replacement for the H3’s ridiculously wimpy factory horn. Meep Meep!
 Hummer Guy Hummer News and Opinion from an experienced off-road instructor






That is a slick set up. I just went with a CO2 tank that I put in the back.
I’ve been looking & looking. I was wondering where you got the kit from? Thanks very much.
I just ordered my Wolo 840 tank kit from amazon.com for $160. I am going to put the quick-connect under the hood though. I have a nasty scrape on my skid plate where you placed your connection so I though I better play it safe.
Thanks for sharing your setup. I plan on documenting the install process for those that may want to try this as well.
🙁
No new HUMMER updates for a month.
🙁
🙁